All published articles of this journal are available on ScienceDirect.
Numerical Analysis of Historic Structural Elements Using 3D Point Cloud Data
Abstract
The 3D laser scanner has become a common instrument in numerous field applications such as structural health monitoring, assessment and documentation of structural damages, volume and dimension control of excavations, geometrical recording of built environment, and construction progress monitoring in different fields. It enables capture of millions of points from the surface of objects with high accuracy and in a very short time. These points can be employed to extrapolate the shape of the elements. In this way, the collected data can be developed to construct three-dimensional digital models that can be used in structural FEM analysis.
This paper presents structural evaluation of a historic building through FE models with the help of a 3D point cloud. The main focus of the study is on the stone columns of a historic cistern. These deteriorated load bearing elements have severe non-uniform erosion, which leads to formation of significant stress concentrations. At this point, the 3D geometric data becomes crucial in revealing the stress distribution of severely eroded columns due to material deterioration.
According to the results of static analysis using real geometry, maximum stress in compression increased remarkably on the columns in comparison with the geometrically idealized models. These values seem to approach the compressive strength of the material, which was obtained from the point load test results. Moreover, the stress distribution of the analysis draws attention to the section between columns and their capitals. According to the detailed 3D documentation, there is a reduced contact surface between columns and capitals to transfer loads.
1. INTRODUCTION
There are a variety of techniques available to generate three-dimensional survey information. This study includes the use of 3D point cloud data provided through laser scanning, which was then employed to reconstruct accurate and detailed solid models for numerical analysis of the subject.
1.1. 3D Point Cloud Data
Point cloud is a collection of XYZ co-ordinates in a common co-ordinate system that presents to the viewer, an understanding of the spatial distribution of a subject or site [1]. It is a kind of raw data; therefore, only through an intense computational effort it can be used in a wide variety of fields such as industrial design, healthcare applications, archaeology, architecture, engineering, and multimedia. There are currently different methods and instruments available in service to capture point cloud data. In this paper, terrestrial laser scanning will be the focus as the 3D point cloud data for this work was provided through scanning.
1.2. Terrestrial Laser Scanning
Terrestrial laser scanning is defined as the use of a ground based device that employs laser to measure the three-dimensional co-ordinates of a given region of the surface of an object automatically, in a systematic order and at a high rate in (near) real time [1]. Standard specification and guidance for the collection and archiving of terrestrial laser scan (TLS) data have already been developed for built heritage and sites [1-3].
The term ‘laser scanner’ is generally applied to a range of instruments that operate on differing principles, in different environments, and with different levels of precision and resulting accuracy [3]. The types that can be used for terrestrial laser scanning are systems based on time of flight (TOF), phase comparison, and triangulation. Typically, both types of scanners record data to sub millimetre level and accuracy. However, depending on the resolution of the system (i.e. minimum distance between measurements), and the accuracy of the points, an appropriate type of scanner should be chosen in order to guarantee reliable documentation. The first is more suited to artefacts and sculpture, while the other two are generally used for building size objects.
1.3. Motivation for Using Point Cloud Data
High resolution and accurate 3D scanning provides information, not only about overall shape and colour, but also the fine surface details. The level of resolution and complexity of the extremely irregular shaped stone columns of the case study required employing three-dimensional (3D) technology. Particularly, the shape of the column surface and cavities are difficult to record in detail, measure, compare, and display using traditional (hand) recording techniques. An understanding of contours of the columns to reveal current load bearing cross sections is crucial to estimate compressive stresses, whether these structural elements are under risk or not. As one of the aims of the project was to generate 3D models of the complete stone surfaces for numerical analysis, point cloud data was suitable for the generation of models.
2. EMPLOYMENT OF LASER SCANNING IN THE FIELD OF STRUCTURAL ANALYSIS
A number of notable projects and studies have been conducted by different research groups using terrestrial laser scanners regarding the built environment, cultural heritage, and historic structures. These works could be classified into two groups according to the varied employment of point cloud data provided through scanning. The first group comprises the usage of spatial data to configure geometrical features of structures including damages, deformations and anomalies [2-9]. The monitoring of historic buildings through the TLS before and after structural interventions could also be added to this group. The project ‘Grotta Dei Cervi’ is one example similar to the case study of this work, presenting a detailed documentation of complex geometries, rock surface, and speleothems (wall concretions, stalactites) of a Neolithic cave, with high resolution and detailed three-dimensional acquisitions [2]. A sub group associated with the characterization of structural elements, particularly masonry walls using TLS captured data, deserves attention. For this purpose, algorithms for automatic geometry extraction of masonry walls, to define individual blocks and joints including dimensions, are employed [20].
The second group comprises the usage of spatial data to build numerical models on the basis of the geometry acquired through the TLS [10-20]. ‘Diagnostic analysis of the lesions and stability of Michelangelo’s David’ is a notable project, combining laser scanner data with FEM analysis through development of a high quality mesh model of the unique statue [12]. The methodology utilized for Michelangelo’s David is quite analogous with the decayed columns of the case study.
3. CASE STUDY: THE CISTERN OF THE HAGIATHECLA BASILICA, SILIFKE, TURKEY
3.1. General Information on the Site
The subject of this study is a half buried covered cistern located on the archaeological site of Hagia Thecla in Silifke, Turkey. According to the extensive survey and excavations carried out by Herzfeld and Guyer at the beginning of the 20th century, most of the structures on the site date from the 5th century [21]. The site has been deserted for a long time and most of the buildings are in ruins.
3.2. Structural Characteristics of Building
The cistern is part of the water storage and distribution system of the ancient settlement. It is rectangular in plan measuring approximately 12.2x14.6 m, about 178 square metres in area, originally capable of holding 1150 cubic metres of water (Fig. 1). The building lies in the north south direction and its access to the interior is from the south.
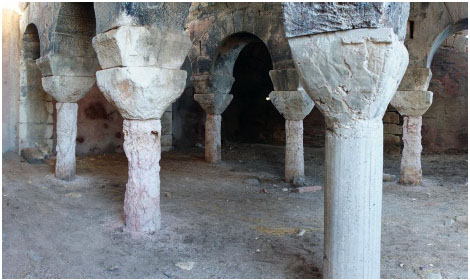
The cistern of Hagia Thecla Basilica, interior space, 2013.
The interior is divided into three aisles by two rows of columns each spaced 2.3 metres apart with the height of 3.5 metres (Fig. 2). The columns in each row are connected by semi circular arches. Three barrel vaults, running in the north south direction, cover the interior.
The columns supporting the upper structure originally had a diameter of approximately 45 cm (Figs. 1, 2). They are made of a pink calcareous stone. The columns have double capitals made of limestone (Fig. 1). It is not possible to make observations about the condition of the column bases and the floor, due to the thick layer of earth accumulated inside the cistern over centuries.
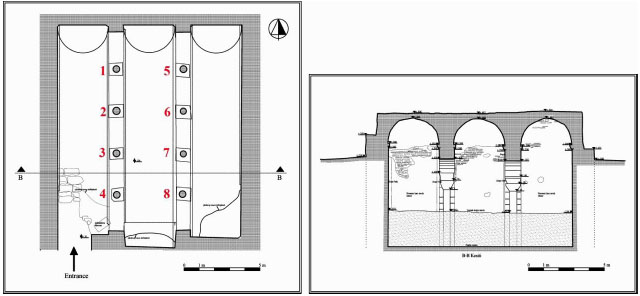
The cistern of Hagia Thecla Basilica, plan and cross section [6].
The outer walls are built with a multi leaf masonry construction system. The outer facing of the walls are made of big limestone blocks, while the inner faces are constructed with brick and mortar. The outer and inner faces of the wall are not connected properly. The space between the haunches of vaults was filled with rubble and mortar, so that a terrace could be built over the cistern.
3.3. Material Properties of the Structure
Physical mechanical properties of the construction materials were investigated at the laboratories of the Civil Engineering Department of ITU and the Directorate for the Inspection of Conservation Implementations (KUDEB) of Istanbul Metropolitan Municipality [23, 24].
The main construction material is stone. Petrographic studies of the stone samples taken from walls, columns, arches and vaults indicate that they are mainly limestone with different porosity, fossil, and clay content.
According to the results of the analyses, columns are made of intaclast biomicritic limestone. The specimens collected from the columns were small pieces, which had fallen out. Point load tests in accordance with ASTM standards [25] were also conducted to collect data on the compressive strength of the material. According to test results, mean value for compressive strength of the material is 28.2 MPa (Spot sample size: 5, deviation: 6.49 MPa) [26].
The lime mortar used in the wall cores is white and has hydraulic properties. The binder: aggregate ratio is 1:2 and the coarse aggregates consist of crushed limestone and river sand. The inner walls are built with brick and mortar. The dimensions of the bricks are 35 x 16 x 4 cm. The plaster used to cover the interior surfaces of the cistern is preserved in some parts of the walls and over the rounded corners. The strength and durability of the plaster was improved by the addition of crushed brick and brick powder which acted as pozzolana.
3.4. Preliminary Numerical Analysis of the Cistern
Preliminary numerical analysis was performed to understand the distribution of elastic stresses throughout the structure under its self weight. For this purpose, reconstitution model of the structure was employed. As the geometrical model represents the initial condition of structure, the earth fill accumulated within the internal space was neglected during the preliminary analysis.
The mesh of the structure was defined by using 3D 20 node solid element (solid186) that can exhibit quadratic displacement behaviour [27]. Maximum edge length is 20 cm and a total number of 196752 elements was used (Fig. 3). In order to save on computer resources, half of the structure was modelled and symmetric boundary conditions were employed.
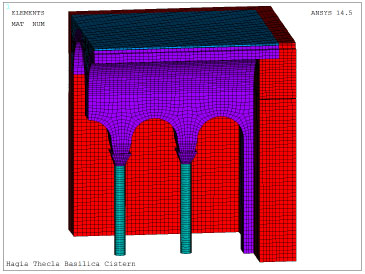
Numerical model of the structure.
Modelling the material properties of a historical masonry structure is quite challenging, particularly in the absence of field and laboratory tests. A linear and isotropic elastic behaviour is assumed for the construction material of the cistern. The main mechanical property of limestone was defined according to the laboratory tests and on the basis of available data from similar structures, the specific weight (γ) being 27 kN/m3, the compressive strength established as 28MPa, the tensile strength taken as a tenth of the compressive strength, the Young’s modulus of elasticity (E) with a value of 2 × 10⁴MPa and a value of 0.2 for the Poisson’s coefficient (Ʋ). For analysis, the foundation of the building was assumed to be rigidly fixed to the ground.
According to the results of the linear static analysis, maximum stresses in compression (3,7 Mpa) appear on the columns (Fig. 4). However, it should be noted that 3D model of initial geometry presents columns with a diameter of 45 cm.
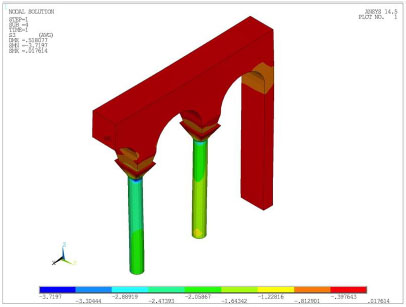
S3 Principal stress distribution of the structure under its self weight.
3.5. Critical Damages
The most vulnerable elements of the cistern are the decayed stone columns. The cross sections of the columns have decreased remarkably (Fig. 5). The exterior surfaces are flaking due to physicochemical effects; the erosion continues. In addition to surface erosion with a non uniform pattern, there are deep cavities on the columns (Table 1).
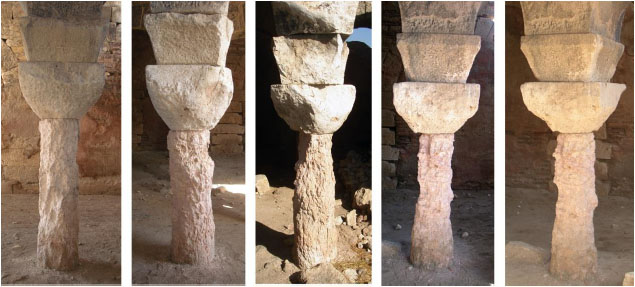
Decayed columns of the cistern (Column 1, Column 2, Column 4, Column 7, Column 8).
One of the columns (column 3) collapsed in the 1960s and was replaced by a concrete column [22]. This was an emergency intervention to stop further damage. The boundaries of the collapsed section can be distinguished easily by the new stones used for the repair (Fig. 1).
Damages of columns.
| Column | Damages | Min. cross section area* (cm2) |
|---|---|---|
| Column 1 | Non-uniform erosions. | 1037 |
| Column 2 | Deep cavities and non-uniform erosions. | 1231 |
| Column 4 | Severe and non-uniform erosions. Fractured and missing parts both on the columns and capitals. | 800 |
| Column 5 | Relatively uniform erosions. | 1355 |
| Column 6 | Relatively uniform erosions. | 1181 |
| Column 7 | Severe and non-uniform erosions. Fractured and missing parts close to the connection with the capital. | 827 |
| Column 8 | Severe and non-uniform erosions. Fractured and missing parts close to the connection with the capital. | 1204 |
4. FURTHER INVESTIGATIONS ON COLUMNS
4.1. 3D Documentation
High definition surveying scanners from Faro Inc. (FARO© Focus3D 120) were employed during the 3D documentation of the structure (Table 2). These scanners are more commonly associated with the recording of buildings or archaeological remains. It is a phase based scanner surveying capable of scanning much larger surface areas. Apart from the columns of the structure, the entire building was scanned from the interior and exterior in order to obtain reliable geometrical information for forthcoming architectural and engineering studies and monitoring.
Technical specification of laser scanner Faro Focus3D 120 [28].
| Measurement range | 120m |
| Minimum range | 0,60m |
| Ranging error* | ±2mm |
| Measurement rate | Up to 976.000 points/sec |
| Horizontal scan range | 360° |
| Vertical scan range | 305° |
| Horizontal step size | 0.009° (40,960 3D pixels on 360°) |
| Vertical step size | 0.009° (40,960 3D pixels on 360°) |
| Laser type | Class 3R (20mW) |
| Laser wavelength | 905nm |
| Beam divergence: | 0.19mrad (0.011°) |
| Weight | 5 kg. |
Appropriate point density is one of the important survey parameters to provide required information from the objects in focus. The smallest feature, required to be detected, influences point density along with the measurement accuracy (Table 3). It also depends on the range to an object for most instruments during the scanning process. Therefore, it is impossible to maintain a fixed point density over an entire subject. However, keeping the distance between object and instrument as constant as possible, the point density could be obtained within a fair range. Overlapping scans also ensure full record of the subject. During the field campaign, the instrument is set up at a number of positions around each column at a distance of a few meters. Thus, overlapping and maximum point density of approx. 5 mm was ensured to represent the highly decayed columns.
Appropriate point densities for various sizes of cultural heritage feature [3].
| Feature size | Example feature | Point density required to give 66% probability that the feature will be visible | Point density required to give 95% probability that the feature will be visible |
|---|---|---|---|
| 10m | large earth work | 3500mm | 500mm |
| 1m | small earth work/ditch | 350mm | 50mm |
| 100mm | large stone masonry | 35mm | 5mm |
| 10mm | flint galleting/large tool marks | 3.5mm | 0.5mm |
| 1mm | weathered masonry | 0.35mm | 0.05mm |
The software ‘FARO Scene’ was employed to register the point cloud using common control points visible in both scans [29]. Preliminary cleaning and cropping of the point cloud data of columns were also achieved through the same software (Fig. 6). Conversion of files into a compatible format to start with the solid model was the last step of the primary stage.
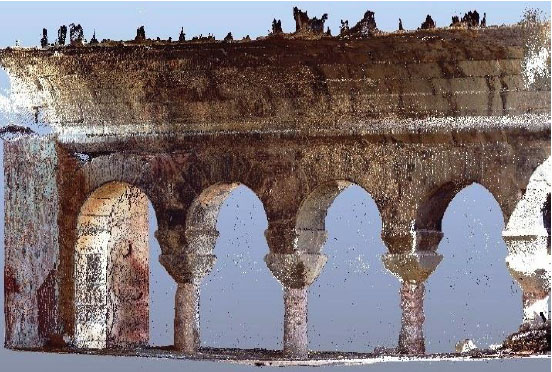
An example from the point cloud data of the structure.
4.2. Solid Models of Columns
3D solid models for numerical analysis were developed through an integrated use of the software ‘FARO Scene’, ‘Geomagic Studio’ and ‘Altair Hyperworks, Hypermesh’ (Fig. 7).
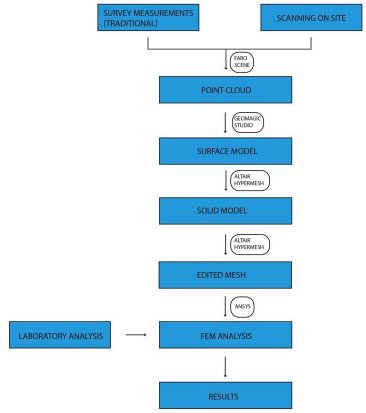
Workflow of the process.
Point cloud data of each column was selected from the whole structure and exported in .igs file format by using ‘FARO Scene.’ Adjustments of noise reduction and surface mesh configuration of captured spatial point cloud data were completed in order to develop nurb surfaces (Fig. 8) through Geomagic Studio [30]. Solid models were then created from closed surfaces through Altair Hyperworks, Hypermesh, which is a high performance finite element pre processor for preparing models, starting from import of CAD geometry to exporting an analysis run for various disciplines [31]. The later fine mesh of the columns with using tetrahedral elements was also generated within the same pre processor software.
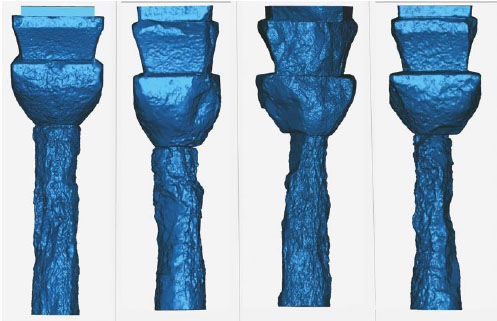
Surface models of Column 1, Column 2, Column 4 and Column 7.
A standard desktop PC designed for general office use was employed to fulfil the computational needs. However, it was insufficiently powerful to take full advantage of the generated products and the proposed numerical analysis. Therefore, the existing one was upgraded for the use of three-dimensional data by the simple addition of extra RAM and hard drives.
4.3. Analysis of Decayed Columns
The decayed columns of the cistern were the subject of the second stage of analysis. For this purpose a 3D solid model of columns generated using TLS data was employed. Having an extremely amorphous geometry, the mesh of the columns and capitals was defined by using 3D tetrahedral solid element (solid187) which is represented by 10 nodes with three degrees of freedom for each node [31]. Maximum size was limited to 60 mm and approximately 500000 elements were used for each column. Material was regarded as homogeneous, behaving within the elastic range under compressive and tensile stresses. Regarding the boundary conditions, columns were assumed to be rigidly fixed to the ground.
Through the analysis of the main structure (section 3.4), nodal forces were provided in order to define the loading conditions for the analysis of columns. Solid models were not limited to the columns themselves, but also included decayed double capitals. The nodal forces were applied through the nodes, which were located at the intersection between upper capitals and masonry walls.
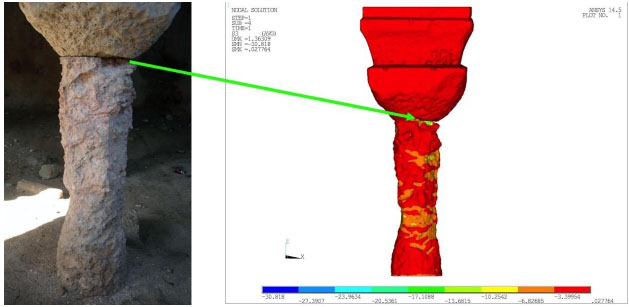
According to the results of linear static analysis, maximum stresses in compression (Column 1: 18MPa; Column 2: 27MPa; Column 4: 26MPa; Column 5: 25MPa; Column 6, Column 7: 30MPa; Column 8: 21MPa) always appear on the zone between columns and capitals (Fig. 9).
The change in cross sectional area, which is basically a geometric discontinuity, causes the columns to experience a local increase in the intensity of stress field. This phenomenon was also clearly seen during the analysis of the whole structure under its self weight. Correspondingly, the upper edges of columns are fractured and damaged (Fig. 9). In addition, observations concerning this specific zone demonstrate a limited contact surface between the two parts, which aggravates the stress distribution.
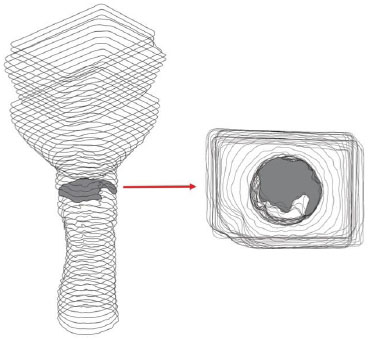
Cross section of Column 7, anomalies due to non-uniform erosion.
According to results, elevated stress values were also presented on the main body of columns (Figs. 10, 11), where local anomalies such as severe erosions, fractures or cavities exist (Column 2: 17MPa; Column 4: MPa; Column 6: 19MPa; Column 7: 14MPa; Column 8: 18Mpa). These geometrical anomalies were successfully captured; thanks to the 3D documentation and represented in the solid models (Fig. 10).
Cross section of Column 2, anomalies due to non-uniform erosion.
Further significant information revealed through 3D scanning concerning the eccentricity of loading (Fig. 12). The effect of eccentricity is clearly evident for some of the columns in terms of stress distribution. The eccentricity derives from two sources: the non uniform erosions and construction defects, which comprise placement of both capitals slightly away from the vertical axis of the columns.
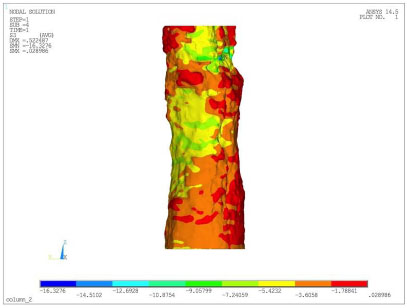
S3 Principal stress distribution of Column 2, stress concentrations due to a deep cavity.
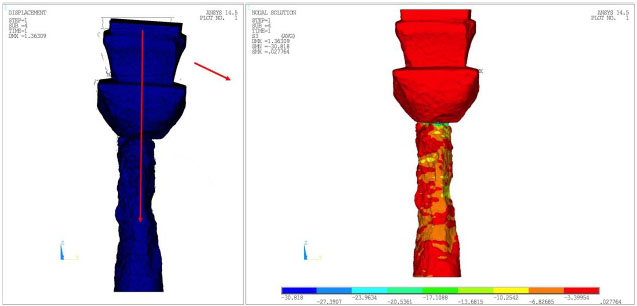
Column 7, eccentricity due to non-uniform erosions, material loss and construction defects.
CONCLUSION
In this study, 3D documentation revealed the complexity of extremely irregular shaped stone columns; these complexities were impossible to record in detail using traditional recording techniques. The data provided through laser scanning allowed development of detailed solid models for numerical analysis. This methodology could be very useful in the field of structural analysis, which heavily involves amorphous geometry. However, the whole process starting from registration of point cloud to creation of meshed solid models was time consuming and computationally demanding. The use of high performance computing facilities reduces the computational efforts and run times involved in the modelling. Another difficulty in terms of the modelling process was the employment of various specialized software for different subject fields and expertise. It is challenging for a single research scholar to master all the software and satisfy the request in a precise and accurate way. Research is clearly needed to develop and improve appropriate and user friendly software, which accommodates multi tasks for modelling needs.
Numerical analysis of the structure under its self weight indicates elevated compressive stresses up to approx. 19 MPa on the columns’ shaft and 30 MPa on the connection zone between columns and capitals. For some of the columns, stress values are beyond the mean value of compressive strength of material, provided through laboratory testing. The state of the columns is also critical in terms of tensile stresses (max 1.8 MPa), where the local anomalies exist. As the surface erosion continues, material damage will deepen and the structure will become more precarious. In order to avoid probable partial collapses, the structure should be supported as soon as possible with a temporary system until the ultimate conservation proposals have been developed. The construction of a protection roof is also one of the primary measures in order to avoid further material decays related to direct exposure to atmospheric effects.
The restoration proposals will eventually focused on the replacement of damaged column shafts with new stone elements. At that point, some questions will rise such as “Which columns have to be intervened? Which parts of the decayed column shafts should be removed and renewed? What will be characteristics of the new stones employed for the replacements? Will any kind of consolidation work needed for the remaining original columns shaft parts while replacing some of them? To reply these questions, one of steps that should be taken in the field is to remove cautiously the accumulated debris around the columns in order to investigate the state of the material. This cleaning work will also influence the extent of repair works considering the removal renewal of damaged column shafts. If the invisible parts of the columns under the accumulated debris are relatively in good shape regarding the surface erosion and cavities, replacement program might be scheduled according to the results of this study. The decision of material, profile and finishing for the new column shaft is subject to architectural conservators and engineers responsible for the conservation works.
Detailed identification of material characteristics of the columns will be one of the topics to be considered for the upcoming studies. The extent of damages and sources of material degradation is crucial to verify the involvement of material character in structural performance. The data provided through laboratory testing will also influence the final decisions regarding the consolidation work concerning the original column shafts kept in situ.
The use of discrete elements is another item to be considered for the future studies. The analysis with discrete dry block stones and friction based interface could provide some mechanisms such as sliding, rotation, and separation at joints. Therefore, collapse mechanism of the missing part that was intervened by using concrete elements and also existing state of the barrel vaults might be determined through a realistic failure mechanism.
CONFLICT OF INTEREST
The authors confirm that this article content has no conflict of interest.
ACKNOWLEDGEMENTS
The authors wish to thank İlhame Öztürk, the director of Silifke Museum, for her kind support and keen interest during the work at the archaeological site. The results presented in the paper related to 3D Scanning would not be obtained without the support of Yavuz Kuytul and Tahir Kuytul from Kuytul Construction Company, Adana. We would also like to express our thanks to Barış Odabaşı, director of Instro Industrial Measurement Products Trade Limited Company, distributor of Geomagic 3D Solutions in Turkey, for his kind support in providing Geomagic Studio during the work.

